

Choosing Image File Formats for Your Blog
By guest contributor Mike Loveland.
The last step in preparing a photo for your blog is to save it in the right format. But which format should you choose?
The first thing you should remember is that any work you have done in high-resolution should be saved in high-resolution. To improve the contrast, composition, and perform any necessary retouching of an image, you need to keep all the work you have done saved at full-resolution. Simply save your file as it is! If you're being extra cautious, then you'll save your work separate from the original file. This way, if you've done something to your file that you regret, you haven't lost your original.
To save the file, go to File > Save As and save a new copy of your original file. If your image was originally a JPG, Photoshop will save your file as a JPG. If you've added layers to it, which JPGs can't support, Photoshop will default to PSD. In either case, it's safe to just save your file. Don't worry if it's JPG or PSD at this point.
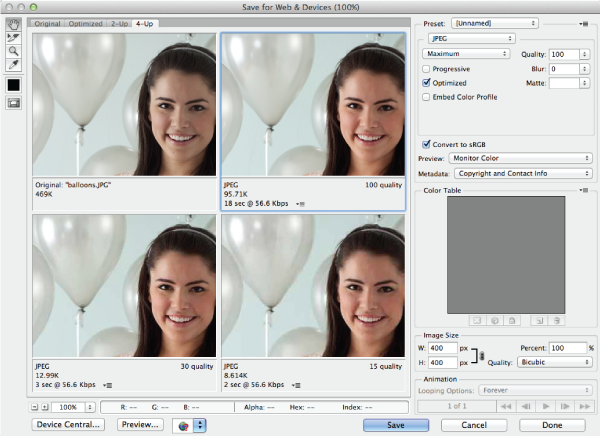
Now that all your hard work is saved at full-resolution, it's time to save your work for your blog. Go to File > Save for Web (in older versions it will be File > Save for Web and Devices), which brings up a dialog box of web-quality image options. Look at the tabs at the top; "Optimized" means that you're looking at a version of your image that matches the selections over to the right; "2-Up" and "4-Up" mean that you can compare several image qualities, and make a choice based on how good the image looks against how low the file size is.
As a general rule, if your image has no text or added graphics, you can choose JPG as your file type, and "High," "Very High," or "Maximum" as the quality. If your quality is lower than High, you'll start to see a loss of image quality.
If your image has text and graphics as well, then choose PNG-24 as your file type. Clean text and graphics tend to lose quality very quickly in the JPG format. PNG-24 will keep your photo and graphics looking their best. If your image has graphics and text, but no photo, then you can achieve a smaller file size by choosing PNG-8. You do not want to use PNG-8 with photos, because you'll see an immediate loss of quality.
In the options on the right side of this dialog box, you'll also want to choose your image width. As a blogger, you should know what your blog column width is. Always save your photos to fill your entire column. In the "Image Size" section, simply put your column width in pixels in the "W" field. The height will adjust proportionately. This only works if your column width is smaller than the current value in that field. If your image is not as wide as your blog column, you should NOT increase the size of your image to fit your blog column.
When you're finished with your options, simple choose "save" and choose where to save your file. Your image is now perfectly sized to your blog and ready to upload!
Photography by Nicole Hill Gerulat.
 Post a Comment
Reader Comments